Compatibility
Minecraft: Java Edition
Platforms
Creators
Details
Racks
Showcase your tools!
Your tools and weapons will no longer envy the armor stands.
From now on, they will also have their own exhibition space!
This presentation concerns the latest version of the data pack
For older ones, you can check them on Github:
🪄Introduction
What is Racks ?
Racks allow you to showcase your tool and weapons, so you don't need to hide them in your chests anymore. This data pack brings a complementary support to armor stands that only support armors (without using commands) on the Java Edition.
How to craft and use a rack?
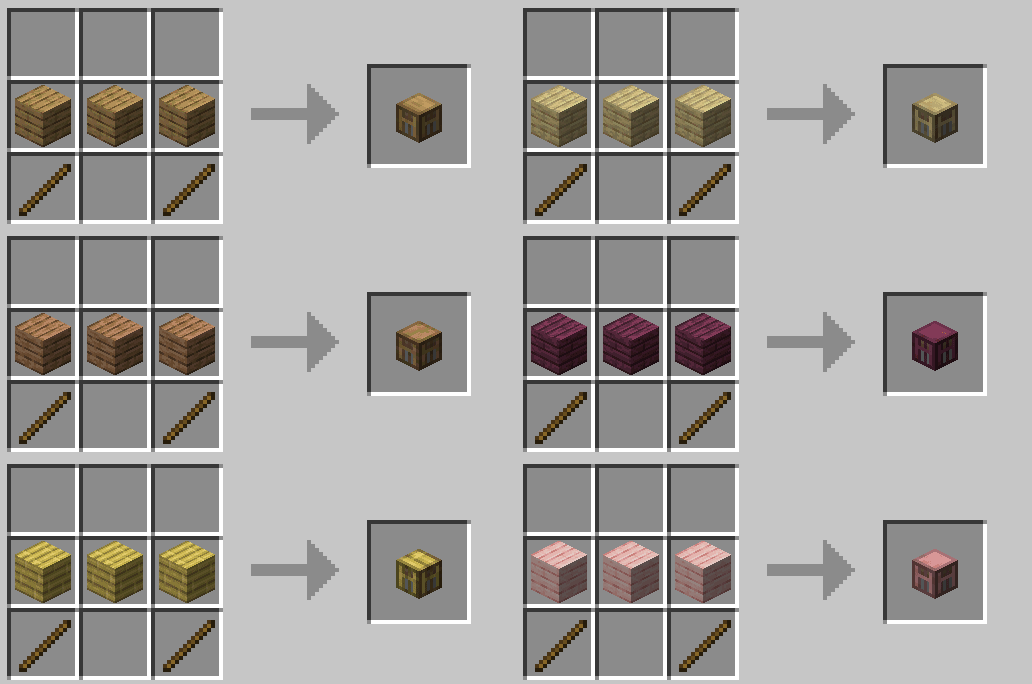
Racks can be crafted using:
- 2 Sticks
- 3 Planks of any wood (oak, dark oak, spruce, bamboo, cherry, warped, etc.)
The recipe is the following:

After you crafted it, you can simply place down your rack. You can either place it on the ground, allowing you to set up to two tools in it. Or on a wall, allowing you to showcase a single tool.
In order to set a tool in it, you need to right click the rack while holding the item you want to place, whithout sneaking. To take the item back, right click it the same way having your mainhand empty.
Racks placed on the ground can handle: axes, hoes, pickaxes, shovels, swords, fishing rod, carrot on a stick, warped fungus on a stick and mace.
Racks placed on a wall can handle: axes, hoes, pickaxes, shovels, swords, bow, crossbow, trident, fishing rod, shield, shears, brush, spyglass, carrot on a stick, warped fungus on a stick and mace.
Right clicking racks while sneaking will change their pose (their items rotation and position). Ground racks have 6 different poses, and wall racks have 4 different poses.
Misc. information about racks
- Ground racks have separated interaction entities for both tools, meaning you can focus the tool slot you want to update without the need of removing or adding a tool in the first slot.
- If you wonder, of course, racks support enchanted and custom items. They keep all their items components. For tools modified with a resource pack, I can't guarantee the exhibition will show an adequate render. This depends on whether the creator of the resource pack changed the item's model or the texture's orientation, or kept them like the vanilla item.
⚙️Settings
Ignore Wall Rack Support
If enabled, racks placed on wall ignore the fact their block support get broken or not, and won't break if it is the case. By default, wall racks break check if their support block is removed every 10 ticks and break if it is the case. This is almost the same behavior as for paintings for example.
You can enable, disable or get the current state of the setting using these following commands respectively:
/function pk_racks:settings/ignore_wall_rack_support/true
/function pk_racks:settings/ignore_wall_rack_support/false
/function pk_racks:settings/ignore_wall_rack_support/get
🧰 Other Commands
Give yourself a rack
If you are an operator of your server or if cheats are enabled in your single-player world, you can give yourself a rack of any variant using these following commands:
/function pk_racks:cmd/give/rack/<variant>
Where <variant> is any type of wood, among: acacia, bamboo, birch, cherry, crimson, dark_oak, jungle, mangrove, oak, spruce and warped.
For example, the command to give yourself an oak rack:
/function pk_racks:cmd/give/rack/oak
Troubleshooting: Recreate all racks from the database
If ever racks have been broken accidentally (using a kill @e command for example) you can run the following command to recreate all racks from the database:
/function pk_racks:cmd/debug/recreate_all_racks
The process will automatically remove all remaining entities and blocks of broken racks before placing fresh ones. All data (id, owner, type, items, variant...) will be preserved. It may take some time for it to complete, so be sure to get the message telling the process ended successfully before interacting with or placing a rack.
🔧 Update from V.2
The data pack provides a process to convert all existing racks from V.2 to V.3.
In order to do so, follow the steps written below. I would also advice you to create a backup of your world using V.2, in case another data pack / plugin / mod accidentally breaks the updating process.
- Remove the Racks V.2 data pack from the
/datapacks/folder of your world, don't uninstall V.2 upstream with the uninstall function, as you should keep its database. - Upgrade your world to the desired version of Minecraft if needed, if it isn't already done.
- Install Racks V.3 by placing it in the
/datapacks/forlder, then using/reloadin game. - Use this following command:
/function pk_racks:cmd/upgrade/from_v2and wait for the updating process to end. If it managed to do so, you should get a message "Updated all racks from Racks (V.2) successfully".
Note: Old racks items from V.2 will automatically be replaced by their V.3 equivalent when you get them in your inventory.
🧹 Uninstall
Racks comes with an automatic uninstallation process. Running it will:
- Remove all racks that have been placed in your world, in every dimensions
- Store the potential items that racks contained to a chest at their respective location
- Remove all scores and storage specific to the Racks data pack
- If there is no more KawaMood data packs installed, also remove all common scores and storages
The uninstalling process may take some seconds to complete. Be sure to wait for the message telling you that you can safely remove the data pack from your world's folder before doing it.
The command to start the uninstalling process is the following one:
/function pk_racks:cmd/uninstall
❓ F.A.Q
Do I need to install a resources pack?
No, this data pack doesn't involve any resources pack.
The texture of the item shows regular player heads, how can I fix that?
You need to be connected to the internet the first time you craft a new type of rack. The textures of the player heads that are used to create their looks are indeed loaded and cached on the client-side, from (old or current) players skins that are stored on a Mojang server.
If you accidentally used a content that required to be online the first time you use it, and now see regular players heads instead of the expected texture, you can still go in the ".minecraft/assets/skins/" folder, then sort the sub-folders by date, and delete some recent folders. Once that is done, if your game was already started, you will need to restart it to update the cached content.
🪠 Report an issue
If you encountered an issue with this data pack, preferably join the Discord server, and open a post in the dedicated #data-pack-issues channel to describe your problem. Please, don't forget to provide all necessary informations including:
- The Minecraft version you're using.
- The version of the concerned data pack you're using.
- If you're using any modified version like Forge, Paper or Spigot.
- If you do, the plugins or mods you're using that may alter the functioning of data packs.
- The list of other data packs you're using, if you have others.
- A clear description of your issue, and a way to reproduce it.
- If necessary, a video or a screenshot of the issue in game.
Before doing that, please read the F.A.Q. section just above. The issue you're facing may be a common one, and a way to fix it may already have been provided in it.
📌 Other links
Thank you for using Racks! It makes me happy to know people are enjoying it. If you want to support its development and the development of other data packs, you can support me on my other social networks:
- Youtube
- Planet Minecraft
- Or if you're in a generous mood, I accept donation on paypal or buy me a kawa (slang term for "coffee")!


