
Compatibility
Minecraft: Java Edition
Platforms
Supported environments


Tags
Creators
Details

Hi everyone. This is a fan-made guide for setting up a multiplayer server for the Hermitcraft Season 9 world download. Season 9 ended in December 20, 2023, and it had some of the most amazing and hilarious moments throughout it. In this guide, I plan to give you a walkthrough of how to setup this world, including Decked Out 2, so that you can play it with your friends, too.
Additional information, including info about the other seasons, can be found in the Q&A section at the end.
Server setup
Before you go looking in the versions tab for a server download...
There is no one-click installation for setting up a server. The modpack download is only there to provide links to the mods that the server should have. The setup process isn't terribly long, but it'll require you to download more than just mods. That being said, I tried keeping the things you need to download to a minimum. If you already have a server setup, you can skip this part.
How to setup a server
The first thing you need to install is Java JDK, if it wasn't already. Minecraft itself comes packaged with its own version of Java, but the server does not. If you have it installed already, then you can continue to the next section to download the server files.
If not, head on over to this page to download the Java installer. Scroll down to the latest JDK version, click on the link for the installer to download it, open it and follow the steps presented.
Download the server files
First, you will need to download the files that will make up your server.
Download the Fabric installer here. This will provide you with the files needed for running a server.
Once it finishes downloading, open it and select the "Server" tab.
For the Minecraft Version, choose "1.20.1".
For the install location, choose the place you would like to install it. I recommend creating a folder in Documents for it, which would look something like
C:\Users\[USERNAME]\Documents\Fabric 1.20.1 server".
Click "Install", which will then open a popup window.
In the popup window, click "Download server jar". Once the text to the left of it turns green, click "Generate". Then click "Done". You can close out of the installer now.
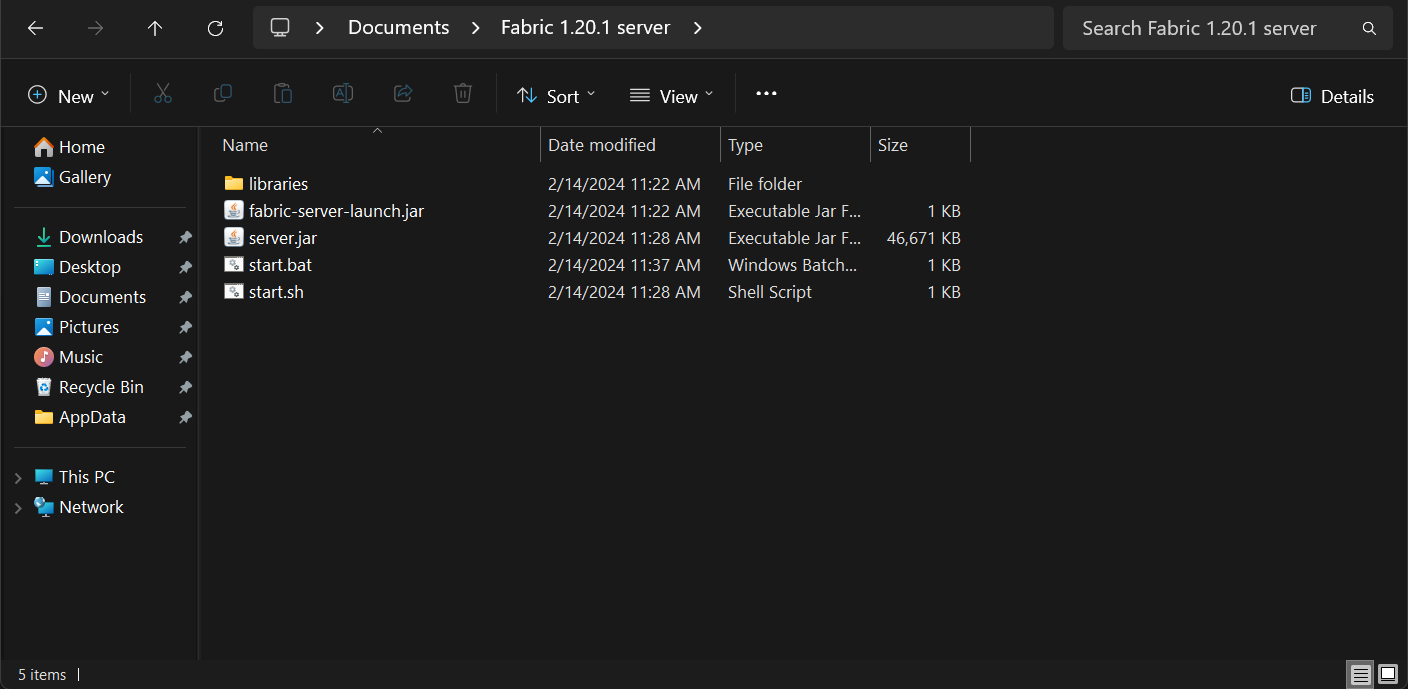
Your server files should look like this:
Setting up the server
Now that the server files have been created, we can start setting up the server.
Open the folder that you just created.
Right-click on "start.bat" and click "Edit". Increase -Xmx2G to -Xmx4G, save with ctrl+s, and close the window.
Once this is done, start the server by opening "start.bat". This will open a new window. If the server runs into an error, it probably means that Java is not installed. The steps for installing it can be found above.
Note that it will say "Failed to load eula.txt". The console should end with this:

Once this happens, close out of the window.
There will now be a "eula.txt" file. Open it and change eula=false to eula=true, then save and close.\
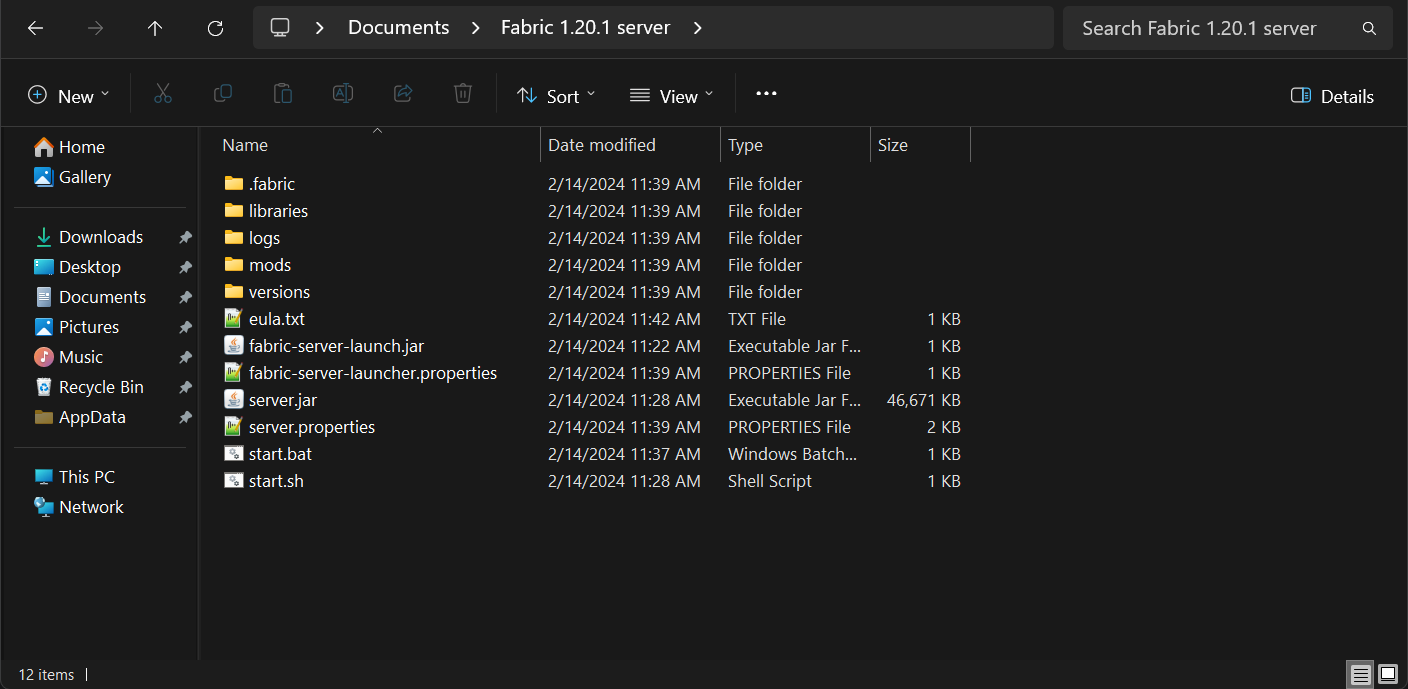
Your server files should now look like this:
World download
The world download can be found on Hermitcraft's own website, in the left panel and under "Maps". Look for "Vanilla S9" and click "Java" to download a zip file.
Right-click on the zip file and click "Extract all...", then in the popup, click "Extract". This will create a new folder.
Rename the folder to world and move it into the server files.
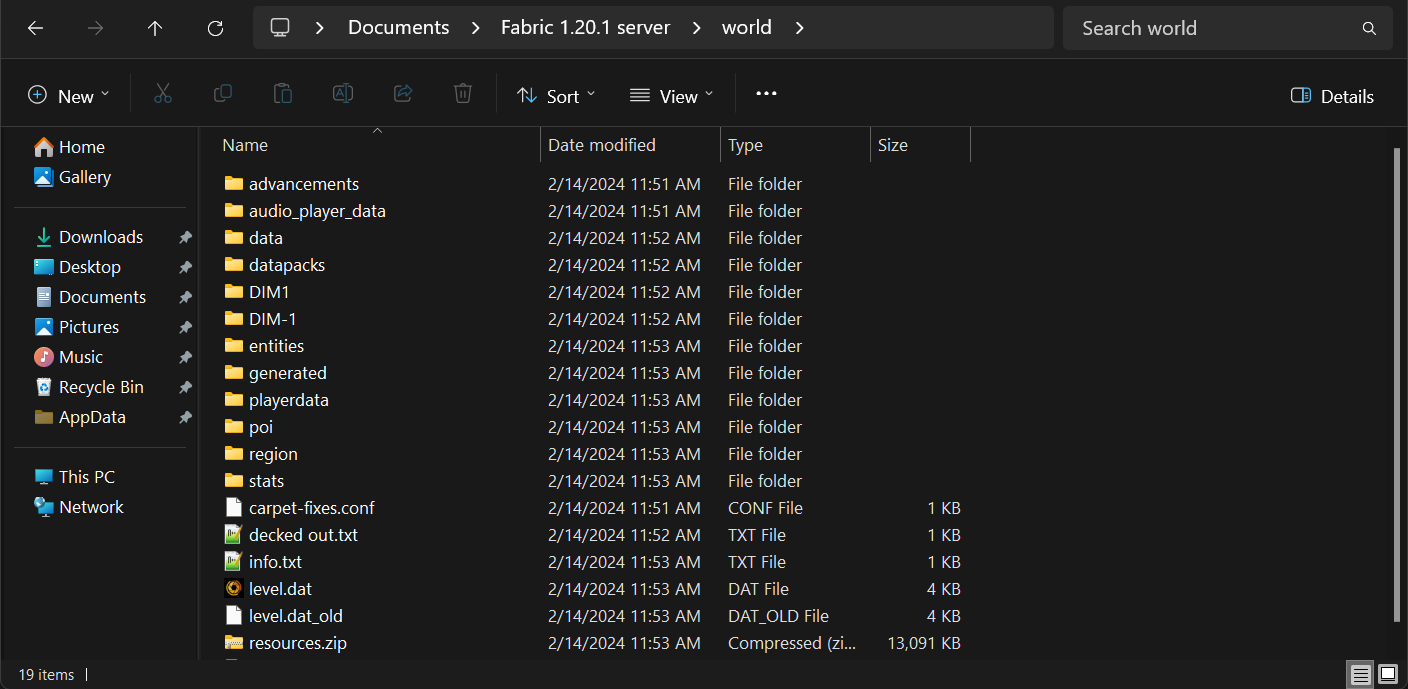
The contents of the world folder should look like this:
You just created a server!
You can now use the "start.bat" file to start the server! You can test it by opening Minecraft 1.20.1 and connecting to "127.0.0.1". This represents localhost. When a computer pings it, it is communicating with itself.
To save the server, use save-all.
To stop the server, use stop.
However, this does not mean that others can connect to it. That still requires a bit of work.
If you need a break, now is the time. This is the first checkpoint of the setup process. Feel free to take a break and come back later. This guide will still be here.
Connecting others to your server
There are two ways to let others connect to your server. The first is by giving them your computer's local IP address, and it requires them to be on the same network as you. The second is through a method called port-forwarding, which allows them to connect from outside your network.
Connecting when on the same network
If they are on the same network as you, such as by WiFi or ethernet, they can join by connecting to your computer's IP address. This is different from localhost.
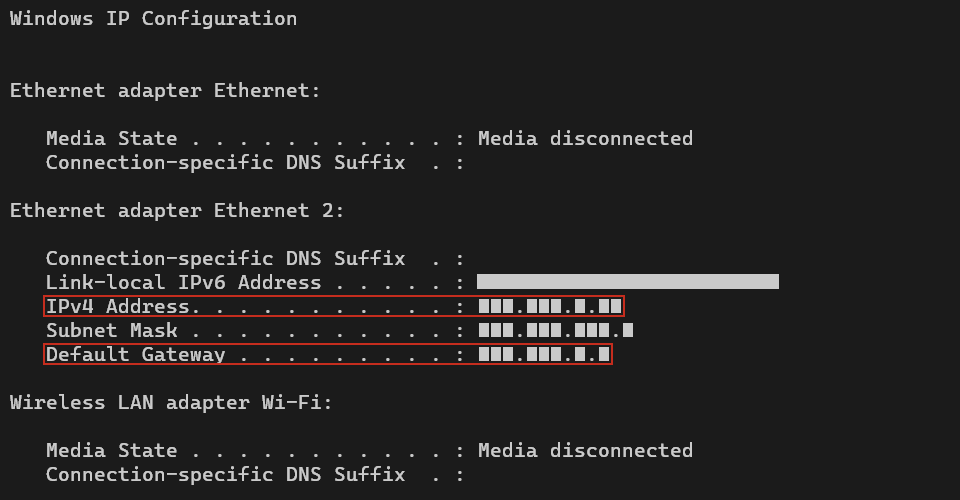
To find you computer's IP address, open Window's terminal and enter ipconfig. Locate the way you are connected to the internet and find the "IPv4 Address" of it. To the right of it is your computer's IP address.
Give them this address and they will be able to connect to your server. Remember that they have to be on the same network as you for this to work.
Port-forwarding
The more common solution is through port-forwarding. When setup, it will forward any request through a specific port to your computer. In this case, the port will represent Minecraft.
There are four things you will need ready:
- Minecraft's port, which is
25565. - Your computer's IP address.
- You can find this by opening Window's terminal and entering
ipconfig. Locate the way you are connected to the internet. Once you have located it, find the "IPv4 Address" of it. To the right of it is your computer's IP address.
- You can find this by opening Window's terminal and entering
- Your computer's default gateway.
- This is also found in the terminal after entering
ipconfig. This time, look for the numbers to the right of "Default Gateway".
- This is also found in the terminal after entering
- The username and password to your router, so that you can setup port-forwarding.
- The default username is typically
admin. The password could be the same as your WiFi's password. If these do not work, then you will have to find the person that setup your router.
- The default username is typically
The result for ipconfig should look like this:
The first step is to login to your router's setup page in a web browser.
Open any web browser and enter the default gateway into the URL bar. It will prompt you for the username and password of your router.
Once entered, look for a tab named "Port-forwarding" and click it. It might be buried deep in menus.
Click "Add New". It could also be labeled "Add Custom Service" or just "Add".
For External and Internal Port Range, enter 25565 .
For Protocol, choose TCP/UDP .
For Internal IP Address, enter your computer's IP address .
If asked for a name, feel free to give it any name, like "Minecraft Server".
Click "Confirm". It could also be labeled "OK", "Done", or "Add".
Below is a screenshot of how the port-forwarding page looks for a Netgear router. Your page might look different, but it should still ask for port ranges and and an IP address.

Congratulations! You have just setup a port-forwarding rule.
Now anyone that tries connecting to your router through Minecraft will be sent to your server. All you need to do now is give them the address to your router.
WARNING
This is the last step of the process, but is also a bit risky. This address is personal information that can be used maliciously.
Be careful when sharing it.
Your IP address...
You can find your router's IP address by Google searching "my ip address". Google should list it on its page, so you won't have to click on any links to find it.
World setup
If you haven't already, download the map and add it to the server files.
It can be found on Hermitcraft's own website, in the left panel and under "Maps". Look for "Vanilla S9" and click "Java" to download a zip file.
Right-click on the zip file and click "Extract all..."; then in the popup, click "Extract". This will create a new folder.
Rename the folder to world and move it into the server files.
The contents of the world folder should look like this:
Resource pack setup
Hermitcraft Season 9 used a resource pack for custom models and textures, like easter eggs and Decked Out 2 items. These won't affect an item's original appearance. For example, Decked Out 2 uses iron nuggets for many of its items, but you can still craft iron nuggets without them looking like Decked Out 2 items.
Go into your server files and open "server.properties" with a text editor.
Replace require-resource-pack, resource-pack, resource-pack-prompt, and resource-pack-sha1 with the following:
require-resource-pack=true
resource-pack=https://download.mc-packs.net/pack/e967dced7cf97da00db265509912a603ed34f1d8.zip
resource-pack-prompt=
resource-pack-sha1=e967dced7cf97da00db265509912a603ed34f1d8
This resource pack was extracted from the world download, renamed, and uploaded to mc-packs.net.
For those playing on Hermitcraft Season 8 worlds and prior, this marks the end of the guide. There is a Q&A section at the end for additional information. The rest of the guide is focused on mod setup for the later seasons—Hermitcraft seasons 8 and prior do not require any mods, and thus do not apply to them, although you are free to use performance-improving mods like Lithium and FerriteCore with them.

Mod Setup (AND VOICE CHAT SETUP)
Hermitcraft Season 9 used a voice chat mod for custom sounds. While you do not need this to play on the world, there are a lot of builds that use it, such as Scar's theme park and most notably Decked Out 2, which incorporates sound as an integral part of its game design. There are also mods that can improve your server's performance, which can help if you want to run the server and your own client on the same computer.
Below is a list of mods that are recommended for the server, with the first two being necessary for the custom sounds, the next for Decked Out 2 for those without a spare account, and the rest being performance improvements for running the server.
- Simple Voice Chat - an in-game voice chat mod that is also required for custom sounds
- Audio Player - the custom sounds mod (requires Simple Voice Chat)
- Carpet - useful for speeding up wait times between games of Decked Out 2
- Lithium - general optimizations
- FerriteCore - memory usage optimizations
- View Distance Fix - fix for when the client's render distance is different from the server's
Simply move the mods into the server's "mods" folder and the server will handle the rest.
You can also find these mods in the Versions tab. You will have to download the modpack through the Modrinth launcher and find them in the mods folder. To find them, click on the Folder button and open the "mods" folder.
Voice chat setup
If you relied on port-forwarding for the server's setup, you will need port-forwarding for the Simple Voice Chat mod. The port for it is 24454. If you need a recap on port-forwarding, well... Here we go again!
You will need four things:
- Simple Voice Chat's port.
- By default, the port is
24454. If it's not, go to your server's config folder and open the voice chat file. It will be listed in there.
- By default, the port is
- Your computer's IP address.
- This should be the same as the one used for your server.
- You can find this by opening Window's terminal and entering
ipconfig. Locate the way you are connected to the internet. Once you have located it, find the "IPv4 Address" of it. To the right of it is your computer's IP address.
- Your computer's default gateway.
- This is also found in the terminal after entering
ipconfig. This time, look for the numbers to the right of "Default Gateway".
- This is also found in the terminal after entering
- The username and password to your router, so that you can setup port-forwarding.
- The default username is typically
admin. The password could be the same as your WiFi's password. If these do not work, then you will have to find the person that setup your router.
- The default username is typically
The result for ipconfig should look like this:
Now, open any web browser and enter the default gateway into the URL bar. It will prompt you for the username and password of your router.
Look for a tab named "Port-forwarding" and click it. It might be buried deep in menus.
Click "Add New". It could also be labeled "Add Custom Service" or just "Add".
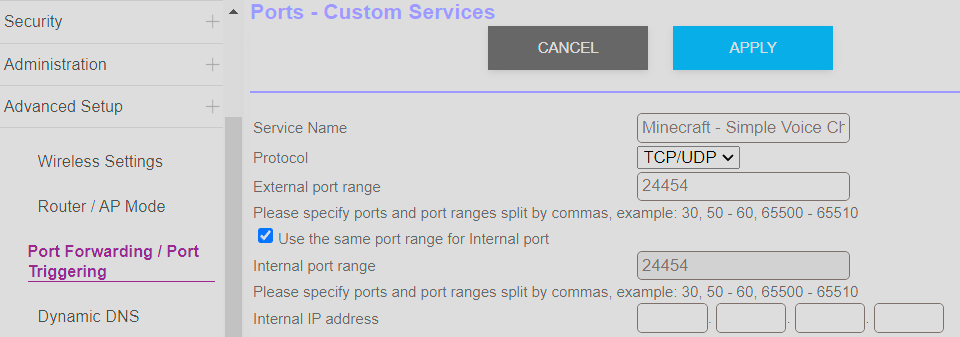
For External and Internal Port Range, enter 24454 .
For Protocol, choose TCP/UDP .
For Internal IP Address, enter your computer's IP address .
If asked for a name, feel free to give it any name, like "Minecraft - Simple Voice Chat".
Click "Confirm". It could also be labeled "OK", "Apply", or "Add".
Below is a screenshot of how the port-forwarding page looks for a Netgear router. Your page might look different, but it should still ask for port ranges and and an IP address.
Voice chat should now be working! And if it's not...
Your computer's firewall might be blocking it. You will have to create both inbound and outbound rules that allow connections through the port, applied to both TCP and UDP.
Open Windows Powershell and enter the commands below.
Press "Enter" a few times afterwards to ensure that all commands are ran.
New-NetFirewallRule -DisplayName "Minecraft Server" -Direction Inbound -LocalPort 24454 -Protocol TCP -Action Allow
New-NetFirewallRule -DisplayName "Minecraft Server" -Direction Inbound -LocalPort 24454 -Protocol UDP -Action Allow
New-NetFirewallRule -DisplayName "Minecraft Server" -Direction Outbound -LocalPort 24454 -Protocol TCP -Action Allow
New-NetFirewallRule -DisplayName "Minecraft Server" -Direction Outbound -LocalPort 24454 -Protocol UDP -Action Allow

Setting up Decked Out 2
Decked Out 2 will work fine on its own, but there are a few things that can be done for QOL. It makes use of a map to show in-game resources, but without a second account, the map will not work.
We will use the Carpet mod to get around this.
It also uses Simple Voice Chat and Audio Player for custom sounds.
How to setup Decked Out 2...
If you haven't already, download the Simple Voice Chat, Audio Player, and Carpet mods and move them into your server's "mods" folder.
Use
/player TangoCam spawn at -485 62 1739 facing 0 0 in minecraft:overworld in spectator
in the chat. This will allow the map to update as the game progresses.
Grab a starter deck by doing the following:
Use: /tp @s -483 113 1964 -90 16
Use: /gamemode creative
Then, crouch and middle-click on the shulker box in front of you. This shulker box is your deck.
Change your gamemode to survival with: /gamemode survival
Originally, there was a 5-minute wait time between games of Decked Out 2. This was to allow items in the dungeon to despawn. However, with the Carpet mod, you can use /tick warp 6000 after each game to bypass this.
Decked Out 2 should work as it was intended now. For an introduction to the game, take a look at How to Play Decked Out 2!.
To start your first game of Decked Out 2, hold on to your deck and use /tp @s -524 110 1997 180 -20.
Walk up the stairs and take a left. There will be two barrels on the ground.
Take a Frozen Shard from the first barrel and place it into the second barrel.
The door in front of you will open for you to walk in. Follow the instructions inside to start your first game of Decked Out 2.
Q&A
Welcome to the end of the guide. If you run into any problems or you want to know more, try the Q&A below.
Q&A - Server
My server is still not working!
If you followed the steps above and did port-forwarding, then it may be that your computer's firewall is blocking their connection. A firewall is a security measure that monitors and controls traffic that enters and leaves your computer. For some, this firewall might block connections to your server. You will have to create both inbound and outbound rules that allow connections through the port, applied to both TCP and UDP.
Simply open Windows Powershell and enter the commands below.
Press "Enter" a few times afterwards to ensure that all commands are ran.
New-NetFirewallRule -DisplayName "Minecraft Server" -Direction Inbound -LocalPort 25565 -Protocol TCP -Action Allow
New-NetFirewallRule -DisplayName "Minecraft Server" -Direction Inbound -LocalPort 25565 -Protocol UDP -Action Allow
New-NetFirewallRule -DisplayName "Minecraft Server" -Direction Outbound -LocalPort 25565 -Protocol TCP -Action Allow
New-NetFirewallRule -DisplayName "Minecraft Server" -Direction Outbound -LocalPort 25565 -Protocol UDP -Action Allow
Voice chat is not working on my server.
If you used port-forwarding for the server's setup, you will need port-forwarding for the mod.
You will need four things:
- Simple Voice Chat's port.
- By default, the port is
24454. If it's not, go to your server's config folder and open the voice chat file. It will be listed in there.
- By default, the port is
- Your computer's IP address.
- You can find this by opening Window's terminal and entering
ipconfig. Locate the way you are connected to the internet. Once you have located it, find the "IPv4 Address" of it. To the right of it is your computer's IP address.
- You can find this by opening Window's terminal and entering
- Your computer's default gateway.
- This is also found in the terminal after entering
ipconfig. This time, look for the numbers to the right of "Default Gateway".
- This is also found in the terminal after entering
- The username and password to your router, so that you can setup port-forwarding.
- The default username is typically
admin. The password could be the same as your WiFi's password. If these do not work, then you will have to find the person that setup your router.
- The default username is typically
The result for ipconfig should look like this:
Now, open any web browser and enter the default gateway into the URL bar. It will prompt you for the username and password of your router.
Look for a tab named "Port-forwarding" and click it. It might be buried deep in menus.
Click "Add New". It could also be labeled "Add Custom Service" or just "Add".
For External and Internal Port Range, enter 24454 .
For Protocol, choose TCP/UDP .
For Internal IP Address, enter your computer's IP address .
If asked for a name, feel free to give it any name, like "Minecraft - Simple Voice Chat".
Click "Confirm". It could also be labeled "OK", "Apply", or "Add".\
Below is a screenshot of how the port-forwarding page looks for a Netgear router. Your page might look different, but it should still ask for port ranges and and an IP address.
Voice chat should now be working! And if it's not...
Your computer's firewall might be blocking it. You will have to create both inbound and outbound rules that allow connections through the port, applied to both TCP and UDP.
Open Windows Powershell and enter the commands below.
Press "Enter" a few times afterwards to ensure that all commands are ran.
New-NetFirewallRule -DisplayName "Minecraft Server" -Direction Inbound -LocalPort 24454 -Protocol TCP -Action Allow
New-NetFirewallRule -DisplayName "Minecraft Server" -Direction Inbound -LocalPort 24454 -Protocol UDP -Action Allow
New-NetFirewallRule -DisplayName "Minecraft Server" -Direction Outbound -LocalPort 24454 -Protocol TCP -Action Allow
New-NetFirewallRule -DisplayName "Minecraft Server" -Direction Outbound -LocalPort 24454 -Protocol UDP -Action Allow
I used the Fabric installer to download the server files, but I'm getting a "No valid 1.20.1 server jar found" red message and I'm missing most of the files.
After the popup window appears, be sure to click "Download server jar" as well as "Generate".
Where can I find the world download?
The world download can be found on Hermitcraft's own website, in the left panel and under "Maps". Look for "Vanilla S9" and click "Java" to download a zip file.
Right-click on the zip file and click "Extract all...", then in the popup, click "Extract". This will create a new folder.
Rename the folder to world and move it into the server files.
The contents of the world folder should look like this:
I downloaded the world from hermitcraft.com, unzipped it, and moved it into my server files, but I don't spawn in that world.
The world folder's name must be the same as the one listed next to level-name= in the "server.properties" file for it to be loaded.
You can either change the world folder's name, or change the name next to level-name=, to match the other.
I'm getting an "Invalid player data" error when trying to join the server.
This may be because of the server resource pack was setup. When copying and pasting the four lines from the Resource Pack Setup section into the "server.properties" file, make sure that the last line,
resource-pack-sha1=e967dced7cf97da00db265509912a603ed34f1d8
does not look like this:
resource-pack-sha1=e967dced7cf97da00db265509912a603ed34f1d8server-ip=
When replacing that line, it could have been missing a line-break, resulting in the two lines being combined into one.
I can't use commands on my server.
Only players with the operator status can use commands on a server. To grant a player the operator status, you will need to use the server's terminal. This is the window opens when starting the server.
Navigate to the server's terminal.
Enter op player_name, where player_name is the name of the player you wish to give the operator status to.
I'm still lost on port-forwarding. Is there a video that I can follow?
I found this video to be quite helpful. It's well-made and does a good job at showing each step.
I know what mods the server will need, but what about the people connecting to it?
People connecting to the server will only need the Simple Voice Chat mod. They do not need Carpet and Audio Player.
I also recommend these mods for better performance and more FPS:
- Sodium
- Lithium
- ImmediatelyFast
- FerriteCore
- More Culling
- Cloth Config API (required for More Culling)
People used to be able to connect to my server, but not anymore.
It could be that the IP address of your server's computer has changed.
To fix this, simply replace the IP address that you used for port-forwarding with the new IP address. Open Window's terminal and entering ipconfig. Locate the way you are connected to the internet. Once you have located it, find the "IPv4 Address" of it. To the right of it is your computer's IP address.
If the IP address was originally from an ethernet connection, but is being now connected via WiFi, be sure to look under "WiFi" or "Wireless LAN adapter" instead.
How do I increase the amount of RAM/memory that my server can use?
Right-click "start.bat" and replace the number in -Xmx2G with the amount of memory you wish to allow. This number is in Gigabytes (GB).
Note that you can only give as much as your computer has available. You can see how much availabe RAM your computer has by opening Task Manager, clicking "Performance" in the left panel, and then by clicking "Memory". There will be a section named "Available". This number can increase and decrease depending on how you use your computer.
What if I just want to play this in singleplayer?
If you want to explore this world in singleplayer, then the process is just like any other map. No need to create a server.
Go to hermitcraft.com to download the map. The download link can be found in the left panel and under "Maps". Look for "Vanilla S9" and click "Java" to download a zip file.
Right-click on the zip file and click "Extract all..."; then in the popup, click "Extract". This will create a new folder.
Simply move this folder into your Minecraft's "saves" folder. The world's ready to play!
I also recommend downloading the Simple Voice Chat mod and the AudioPlayer mod. While they aren't required, there are a lot of builds that use it, such as Scar's theme park and Decked Out 2, which incorporates sound as an integral part of its game design.
Where do I find my Minecraft's files?
You can find Minecraft's files atC:\Users\Default\AppData\Roaming\.minecraft.
If you're using a 3rd-party launcher to play Minecraft, it may be elsewhere. These typically have an "Open Folder" button that you can use instead.
If you're running into performance issues or could use more FPS, I would recommend these mods:
- Sodium
- Lithium
- ImmediatelyFast
- FerriteCore
- More Culling
- Cloth Config API (required for More Culling)
Q&A - Decked Out 2
Where can I find Decked Out 2?
Decked Out 2 is found within the Deep Frost Citadel, built by Tango Tek, and located East of the Shopping District.
From the world spawn inside the Shopping District, face South towards the giant statue of King Ren and find your way to him. Then continue South along the stone bridges, past the amethyst-topped shops, past the massive white factory, through the fenced horse pasture, and into the Scarland theme park, landmarked by a massive castle. Turn left towards the East and walk through the theme park, under the floating-boulder bridge, and into the birch forest. Continue through the birch forest and into the taiga biome, and you will find yourself standing at the base of the the Deep Frost Citadel. The entrance will be towards the right, in front of a massive nether portal.
You can also use: /tp @s -524 103 2164 180 -16
How do I start a game of Decked Out 2?
To start your first game of Decked Out 2, hold on to your deck and use /tp @s -524 110 1997 180 -20.
Walk up the stairs and take a left. There will be two barrels on the ground.
Take a Frozen Shard from the first barrel and place it into the second barrel.
The door in front of you will open for you to walk in. Follow the instructions inside to start your first game of Decked Out 2.
Where do I get a starter deck for Decked Out 2?
Use: /tp @s -483 113 1964 -90 16
Use: /gamemode creative
Then, crouch and middle-click on the shulker box in front of you. This shulker box is your deck.
Remember to use /gamemode survival before playing Decked Out.
Decked Out 2 items are showing up as iron nuggets.
This is because Decked Out 2 uses a resource pack for its items. These won't affect an item's original appearance. You can still craft iron nuggets without them looking like Decked Out 2 items.
To get the resource pack for just yourself, go to this link to download the resource pack and move it into Minecraft's "resourcepacks" folder.
If you want to add the resource pack to the server, go into your server files and open "server.properties" with a text editor.
Replace require-resource-pack, resource-pack, resource-pack-prompt, and resource-pack-sha1 with the following:
require-resource-pack=true
resource-pack=https://download.mc-packs.net/pack/e967dced7cf97da00db265509912a603ed34f1d8.zip
resource-pack-prompt=
resource-pack-sha1=e967dced7cf97da00db265509912a603ed34f1d8
This resource pack was extracted from the world download, renamed, and uploaded to mc-packs.net.
The map for Decked Out 2 isn't working.
This is because the map does not update unless the map's chunk is loaded. During the season, the chunk was kept loaded by using a second "camera" account. Since not everyone has a second account, we can use the Carpet mod to add a fake player.
Use
/player TangoCam spawn at -485 62 1739 facing 0 0 in minecraft:overworld in spectator
in the chat to spawn a fake player over the map's chunk. This will keep the map updated.
Q&A - Info
Does Hermitcraft have an official website?
Yes! You can find it at hermitcraft.com. The site has a list of their members, socials, and previous world downlaods, and is always updated with their latest videos.
Where can I find their livestreams?
You can find their livestreams at twitch.tv/team/hermitcraft. This page contains a link to all of the Hermits' Twitch streams.
What datapacks does Hermitcraft Season 9 use?
You can find a list of most of the datapacks in this Reddit post.
You can obtain most of these datapacks via Vanilla Tweaks.
If you downloaded the Hermitcraft 9 world, you can also find them in the "datapacks" folder.
The other Hermitcraft seasons?
All world downloads can be found on Hermitcraft's own website, in the left panel and under "Maps", and by clicking the "Java" text of the desired season (For example, "Vanilla S9" is for Season 9 while "Vanilla S8" is for Season 8). This will provide a .zip file that can then be extracted.
Hermitcraft Season 10 Info thread
Minecraft version: 1.21.8
Resource pack: Yes (link)
Required mods:
Simple Voice Chat,
Audio Player
Hermitcraft Season 9 Info thread
Minecraft version: 1.20.1
Resource pack: Yes (link)
Required mods:
Simple Voice Chat,
Audio Player
Hermitcraft Season 8 Info thread
Minecraft version: 1.17.1
Resource pack: Yes (link *not-working)
Required mods: None
Hermitcraft Season 7 Info thread
Minecraft version: 1.16.4
Resource pack: None
Required mods: None
Hermitcraft Season 6 Info thread
Minecraft version: 1.14.4
Resource pack: None
Required mods: None
With the downloaded .zip file, right-click on it and click "Extract all..."; then in the popup, click "Extract". This will create a new folder.
For singleplayer, move the folder into your Minecraft's "saves" folder.
For servers, rename the folder toworldand move it into the server files.
How could I replicate the Hermitcraft survival experience?
Consider using this modpack, created by henkelmax in collaboration with Xisuma.
Thanks to the following sources
https://www.youtube.com/watch?v=K7QXFbBHCX4
https://www.youtube.com/watch?v=vI3gEJHLII4
https://www.reddit.com/r/HermitCraft/comments/t78411/hermitcraft_season_9_information_thread/
https://www.reddit.com/r/HermitCraft/comments/18sa8j6/how_to_play_decked_out_2/