Compatibility
Minecraft: Java Edition


Links
Tags
Creators
Details
For 1.21 and up check the New Custom Paintings Resource Pack and Datapack using the new Painting variants feature
Custom paintings resource pack
This Minecraft resourcepack adds some new paintings by using the CustomModelData feature added in 1.14.
It is inspired by the custom paintings used on the Hermitcraft server, as seen in this video (14:53).
Installation
Install like any other minecraft resource pack.
Usage
The following image shows the paintings available in the resourcepack. You can also add your own.
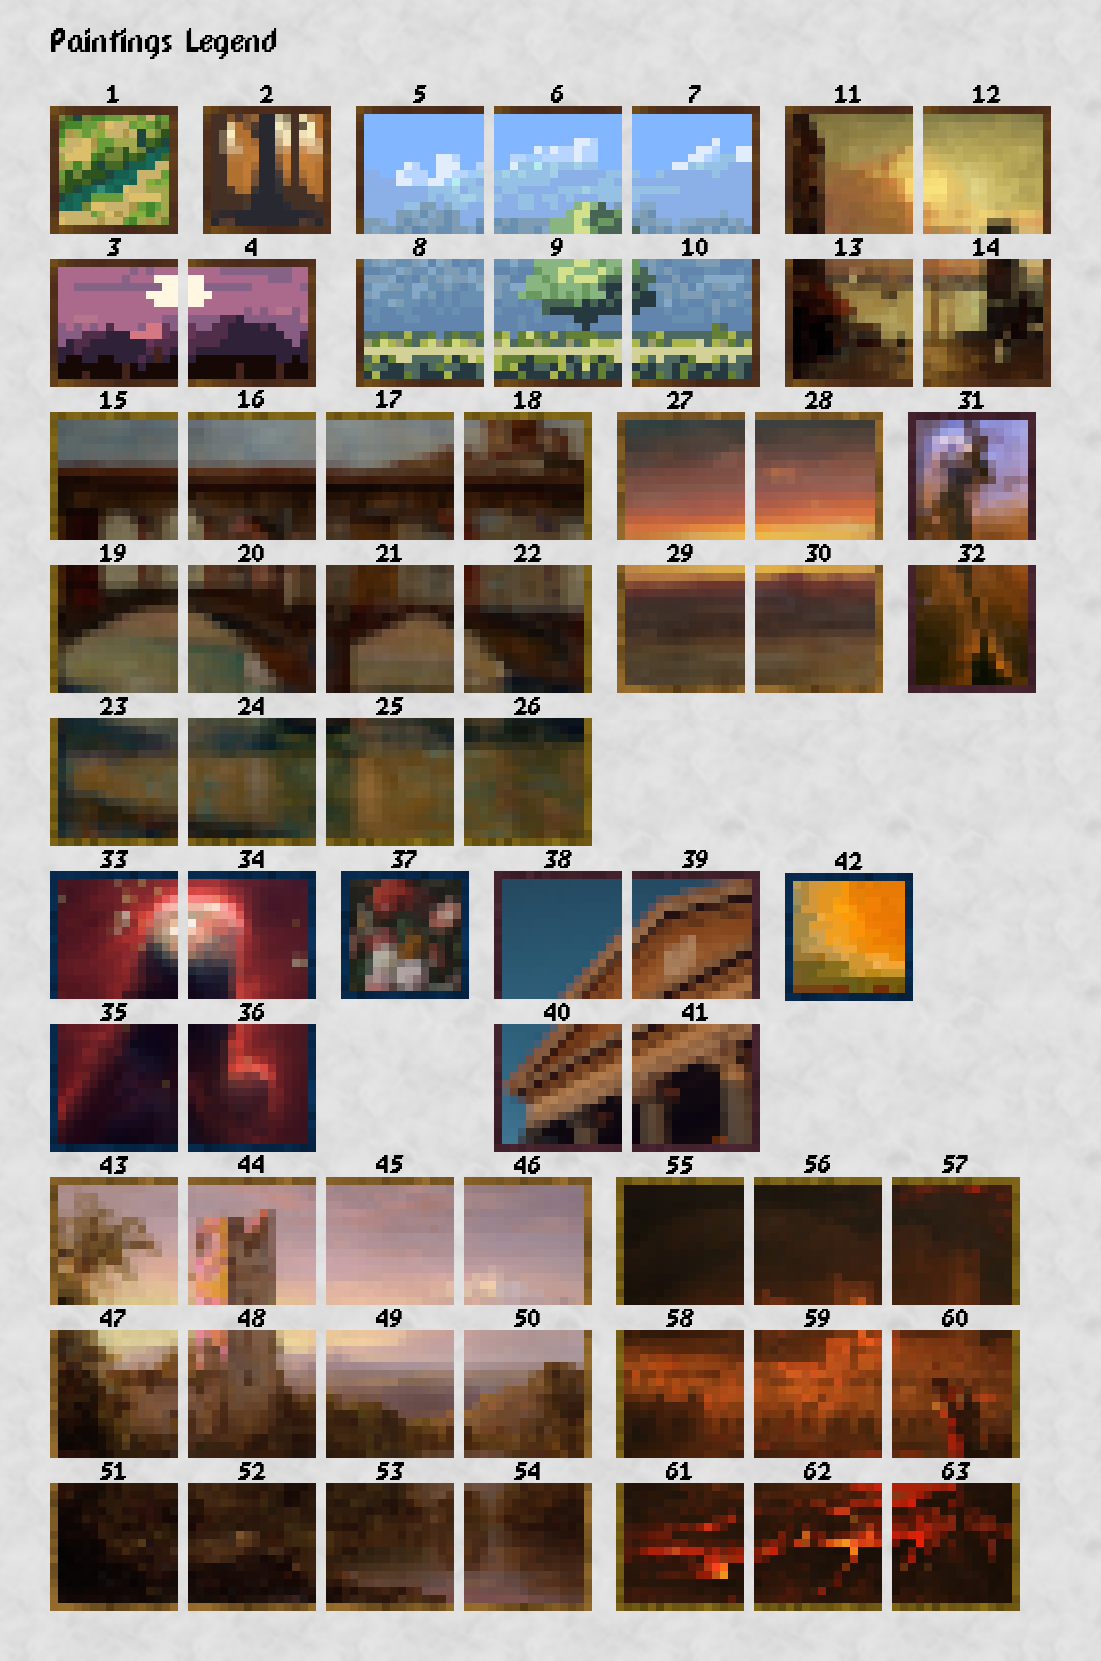
To get the paintings you have two options: using the give command or using mukitanuki's Custom Roleplay Data datapack.
Give command
Use the following command to give the player the custom painting defined by the CustomModelData number.
/give @p painting{CustomModelData:<number>}
Where <number> is the painting index as defined in painting.json
mukitanuki's Custom Roleplay Data datapack
Alternatively, and more survival friendly, CurseForge user mukitanuki has created a datapack to change an items CustomModelData tag. You can download it from CurseForge.
Once installed you can run the command /trigger CustomModelData set <number> changing <number> for the index of the painting.
Check the CurseForge page for complete instructions on this datapack
Adding custom paintings
Paintings in this resourcepack are composed of 16 by 16 pixels tiles, although the texture can be upscaled.
Textures
Place your textures (in png format) into assets\minecraft\textures\item\paintings directory inside the resource pack. They can also be placed inside their own subdirectory to keep them organized.
Models
Create a new .json file for each painting you want to add in assets\minecraft\models\item\paintings. You can also place this files inside of their own subdirectory.
Copy and paste the next code into the file you just created and change the text between quotes after the following properties:
{
    "parent": "item/paintings/master_painting",
    "credit": "YOUR_NAME",
    "texture_size": [16, 16],
    "textures": {
        "0": "item/paintings/YOUR_TEXTURE",
        "1": "painting/back",
        "particle": "item/paintings/YOUR_TEXTURE"
    }
}
- "credit": Change YOUR_NAME for the message to credit you with this painging.
- "texture_size": Change this numbers if your painting is not 16 by 16 pixels.
- "0" and "particle": Change YOUR_TEXTURE for the name of your texture withouth the
.pngextensions. If you placed the textures inside of a directory you also have to include it.
Adding models to the painting
Edit assets\minecraft\models\item\painting.json and add a comma after the last predicate line and paste the following code.
{"predicate": {"custom_model_data":MY_INDEX}, "model": "item/paintings/MY_MODEL"}
Change:
- MY_INDEX: for the index of the new painting, make sure they are not repeated or it will override another painting.
- MY_MODEL: change my model for the name of the
.jsonfile you created in the previous step, without the file extensions. If you placed your file inside of a directory remember to include it as well.
Credits
First 4 sample paintings in the resource pack are created from art released under CC0 license by ansimuz. You can find the original images at the next links:
- Painting 1 "River" - Top Down River - Shooter Environment by ansimuz
- Painting 2 "Forest" - Forest Background by ansimuz
- Paintings 3 and 4 "Mountain" - Mountain at Dusk Background by ansimuz
- Paintings 5 to 10 "Road" - Country Side Platform Tiles by ansimuz
The rest of the paintings are created based on public domain images. You can find the originals in the next links:
- Paintings 11 to 14 "Port" - Cumulus Clouds, East River by Robert Henri
- Paintings 15 to 26 "Bridge" - Florence by Henryk Dietrich
- Paintings 27 to 30 "Sunset" - Sunset by Frederic Edwin Church
- Paintings 31 to 32 "Fairy Nebula" - The Fairy of Eagle Nebula by NASA, ESA, and The Hubble Heritage Team (STScI/AURA)
- Paintings 33 to 36 "Cone Nebula" - Cone Nebula/NGC 2264 by NASA, H. Ford (JHU), G. Illingworth (UCSC/LO), M.Clampin (STScI), G. Hartig (STScI), the ACS Science Team, and ESA
- Painting 37 "Flowers" - Still Life with Flowers in a Glass Vase by Jan Davidsz. de Heem
- Painting 38 to 41 "Temple" - brown high-rise building by Lucrezia Carnelos
- Painting 42 "Sun" - After the Deluge by George Frederic Watts
_Star-Forming_Pillar_of_Gas_and_Dust.jpg)